


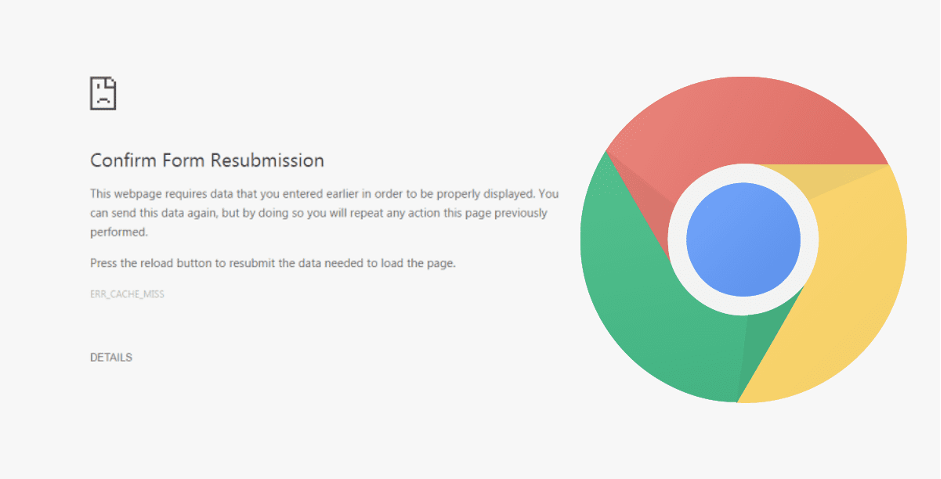
ERR_CACHE_MISS Errors is among the common errors in Google Chrome. One can easily lose patience after seeing these kinds of error messages occurring repeatedly in the browser. However, these error codes also warn users of any issues with their browsers or any other data that they may have forgotten to submit.
Likewise, a similar warning notice on the Chrome indicates that the browser needs more data from the users. Besides, there are a few quick and simple ways that can be used to fix this problem and still access the website easily.
What are the key causes of ERR_CACHE_MISS Error?
- Extension Interference
Google Chrome extensions are the extra apps that improve the functionality of the browser. The Chrome caching problem, however, might be caused by certain browser extensions interfering with the caching mechanism. Hence, this causes the ‘ERR_CACHE_MISS’ message, indicating that the interference of the extension prevented access to the cache files.
Google Chrome extensions that change browser behavior, modify headers, or influence network requests could hinder the cache retrieval procedure. To fix the “ERR_CACHE_MISS” problem, disable or update any extensions that are causing clashes.
- Cache Conflict
Cache files on the computer may mostly cause encounters or inconsistencies, when the viewed website version is not compatible with, out-of-date, or corrupted in the cache.
- Network Connectivity Issues
In case users are using Google Chrome to browse a website and the internet connection suddenly becomes unreliable due to weak signal or network interruption, the network connectivity problems may possibly be the problem source. The broken network connection prevents the browser from retrieving the required cache while trying to visit a website resource.
In these situations, the error code “ERR_CACHE_MISS” alerts users that mainly the network problems prevented the browser from retrieving the necessary resources. To find out if connectivity is the main issue, make sure the internet connection is steady or try viewing the site from a different network.
9 Quick Methods to Solve the ERR_CACHE_MISS Error on Chrome
#1. Update the Browser with the Latest Available Version
Sometimes outdated web browsers versions can trigger various types of errors, which must be updated to the most recent version. Similarly, updating to the most recent version of the Chrome browser will fix the issue with ERR_CACHE_MISS.
- Go to Settings first and then ‘About Chrome’ to start updating the Google Chrome browser.
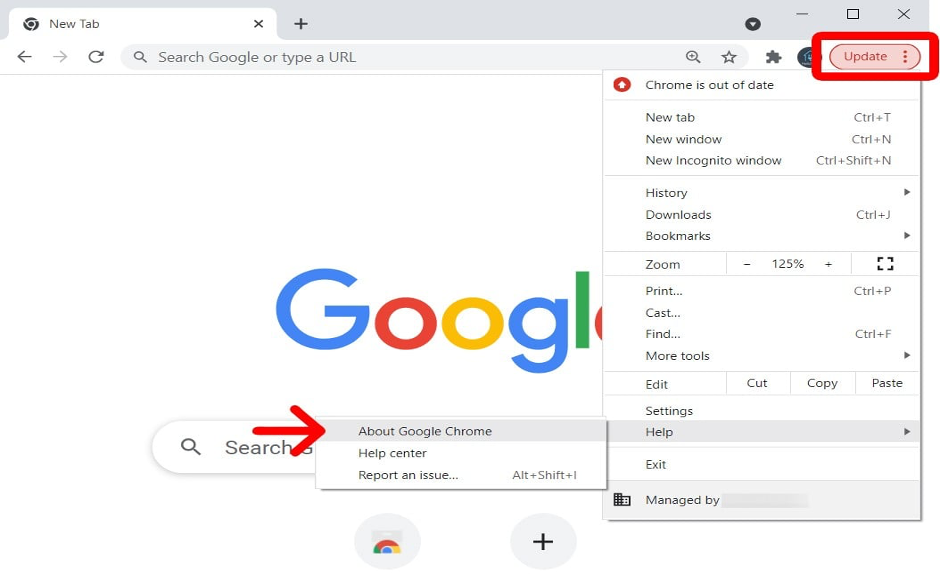
- As seen in the image above, Chrome will begin checking for updates automatically ‘About Chrome’ is clicked. It will prompt users to upgrade right away in case a new version is available.
- Once the update has completed successfully, press the relaunch tab to complete the procedure.
- Now, if the ERR_CACHE_MISS problem is primarily being caused by an outdated version of Chrome, it needs to be fixed right away. Simply try accessing the website again; if everything is done correctly; if not, look for other options below.
#2. Reload or Refresh the Webpage
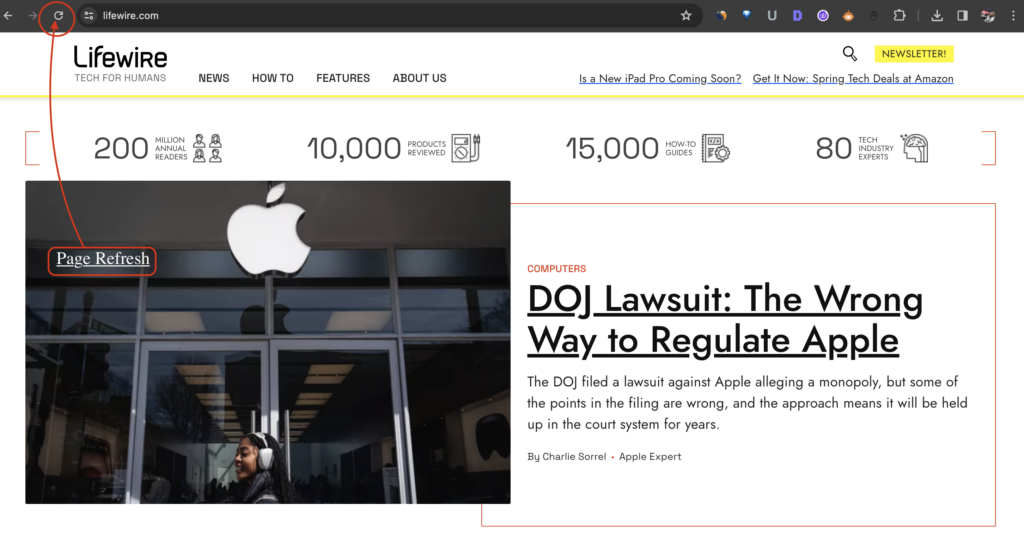
Reloading the webpage or refreshing it is the simplest way to try. This problem can sometimes be caused by bad internet connectivity. For instance, as the webpage loads while trying to access it, users may not realize if their internet connection temporarily disconnects.
Either click the “Reload this page” icon next to the URL bar of the Chrome browser or use the F5 key on the keyboard to reload or refresh the webpage. If this doesn’t work, there are more effective options listed below.
#3. Clear Browsing Data or History
Corrupt files stored by Chrome browser in its cache memory may also be causing the ERR_CACHE_MISS. Quickly fix this by completely deleting the browsing history or data.
- To perform this, navigate to the Customize & Control Google Chrome tab in the Chrome. It is indicated by three horizontal dots in the upper right corner of the browser.
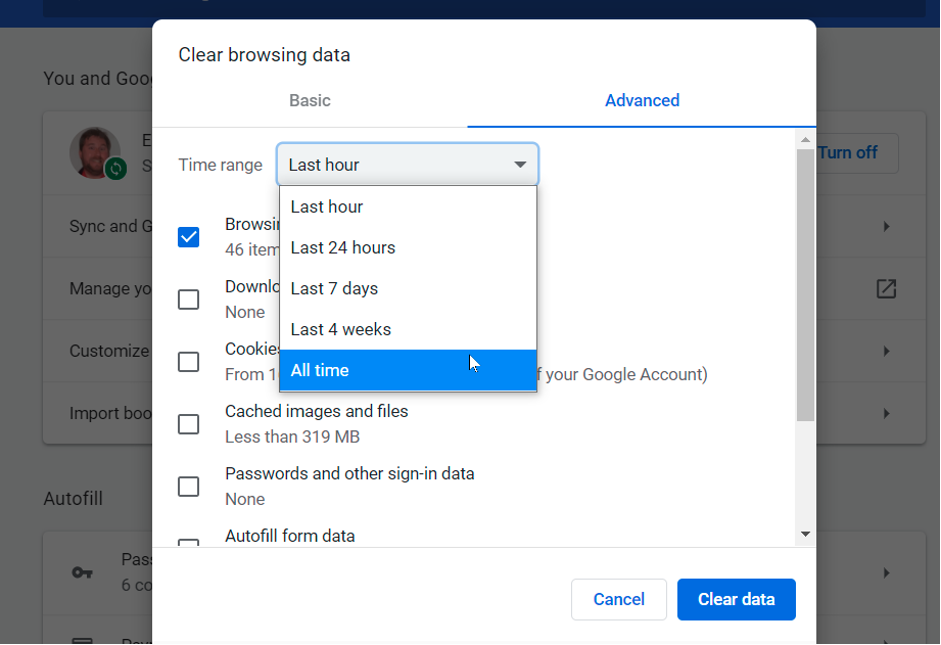
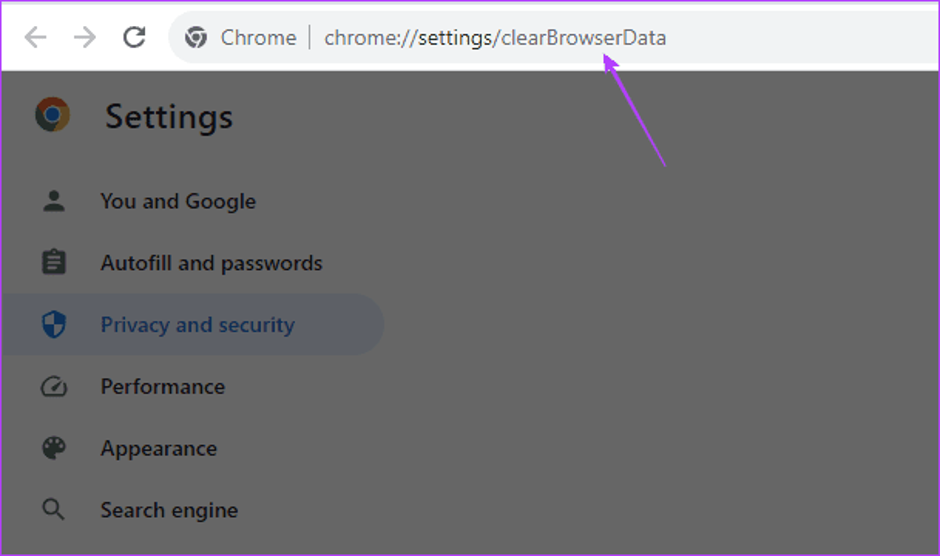
- Proceed by selecting Customize and Control > History > Clear Browsing Data in Google Chrome.
- As seen in the image below, choose the ‘Time range’ and ‘All time’ and check the appropriate field. To finish the procedure, click the Clear data option.
- Check the website again and see whether this fixes the error; if it does, corrupt cache files, precisely were the primary cause of the ERR_CACHE_MISS error. If not, try the following process.
#4. Refresh or Change the Network Settings
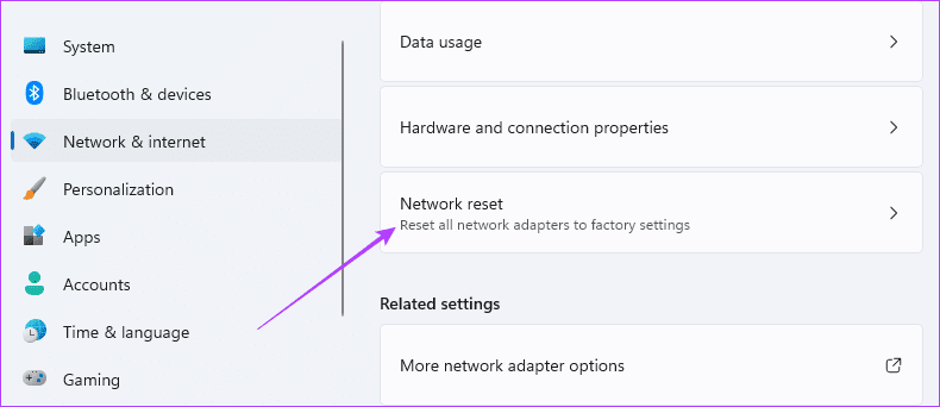
Any issue with the current network settings could also be causing this error. Therefore, try using CMD to update or modify the network settings as quickly.
- The first step is to type “CMD” into the Windows search option and then right-click to choose “Run as Administrator”.
- Now, a window appears when the command prompts. To reset the current network settings, run the following commands.
Note: Users must hit Enter after typing every line to move on to the next command line.
- ipconfig/release (to give up lease)
- ipconfig/all (to show details of network configuration)
- ipconfig/flushdns (to clear local cache of computer)
- ipconfig/renew (to renegotiate an IP address lease)
- netsh int ip set dns (to display and configure various network communication’s status)
- netsh winsock reset (to undo configurations)
- ipconfig renew
- ipconfig renew
#5. Deactivate Chrome Browser Extensions
Another reason for this error could be an installed, corrupted, or malicious extension on the Chrome browser. Therefore, the easiest way to fix this kind of problem is to just disable every extension that is installed and check to see if the problem still exists.
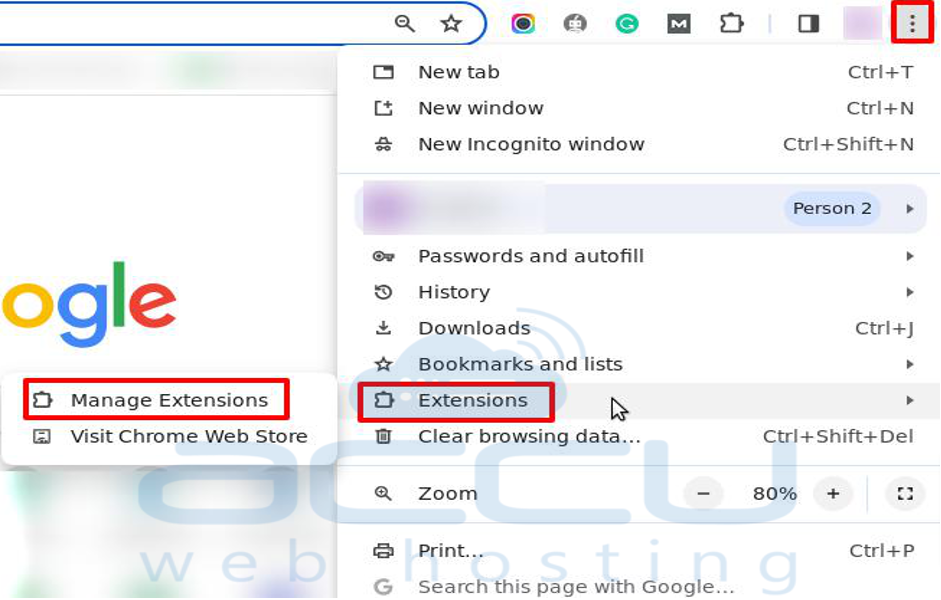
- To start the procedure, open Chrome browser, click the extension icon in the upper right corner, and select the Manage Extensions option.
- All the installed Extensions for the browser will now be visible on a single page. To disable an extension, navigate to it, select it, and then click the toggle.
- Now disable each extension individually, refresh the browser, and check if the error has been resolved to know which extension is the primary culprit.
If it resolves the problem, it indicates that the extensions were the source of the problem; if not, proceed to the next step.
#6. Change LAN Settings to Automatic
The network connectivity could while using a VPN or proxy to conceal location and then overlook for a while. Therefore, users can change their LAN settings to automatic so that they can easily detect such scenes and avoid them.
- To start the procedure, type inetcpl.cpl into the Windows Search box at the (right) bottom of the screen and click ‘Enter’.
- A popup window opens after clicking on the inetcpl.cpl file. Click on the connections tab.
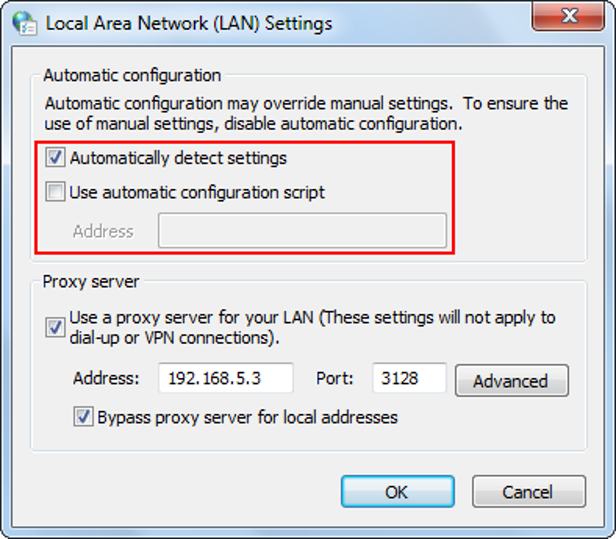
- After selecting the connections tab, select the LAN settings tab, found at the end of the tab.
- To finish the process, check the box next to the “Automatically detect Settings option” in the newly shown window and click the OK button.
#7. Change the Browser Settings
If the methods listed above did not work, the browser’s settings could be the problem. Let’s try to adjust the browser’s settings to get the website back to function.
- To start the procedure, go to More Options, then Settings on the Chrome browser.
- Click the Advanced tab now, and then select the Reset Settings option.
- There are now two alternatives available to select from. To return settings to their default state, however, select “Restore Settings to the original defaults.”
- Following that, the same screen will display a new window. Now select the “Reset Settings” button:
- The last step is to restart Chrome and visit the website to see if the error still occurs. Nevertheless, if this too doesn’t work and is showing the same message, try the next approach.
#8. Disable the Cache System
In case none of the seven techniques were effective in solving the ERR_CACHE_MISS error, try this final and most effective approach.
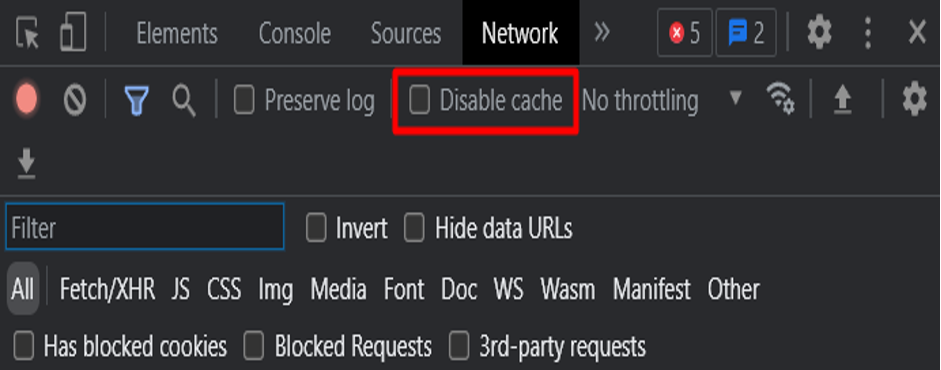
- To start the procedure, open the desired page to view, right-click on it, and choose Inspect from the menu. This will allow users to use Chrome’s Inspect Element feature.
- The Inspect option will cause a panel to appear on the screen. Select the Network Tab, ensure the Disable Cache option is checked.
- Check if the problem has been fixed by reloading the page. If not, get in touch with the ISP and follow their recommended measures.
#9. Change DNS settings on Windows PC
Any newbie may find this method a little complicated since it needs a lot of stages and gets a bit complex. However, if none of the aforementioned solutions work to resolve the DNS server unresponsive issue, try this efficient solution.
- The first step to do if when using Windows is go to Network Connections and follow the steps listed below.
- Select the connection that is active on the View Network connections screen, then right-click it to display more options. Choose some characteristics.
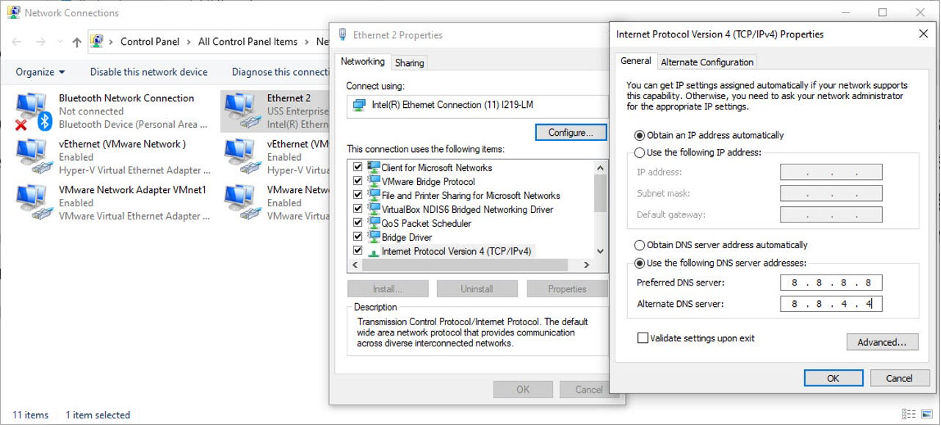
- Upon selecting the properties, a new window will appear, here, users are expected to choose IP Version 4 (TCP/IPv4):
- To manually set a different DNS address, choose the “Use the following DNS (Domain Name System) server address” option in the new Internet Protocol Version 4 window.
- Enter 8.8.8.8 as the desired DNS server and 8.8.4.4 as the alternate DNS server for Google’s public DNS IPv6 address.
The Bottom Line
In conclusion, the Chrome browser cache issue ERR_CACHE_MISS is a common one that can happen on almost any page. It means that the user’s cache browser needs to load a page or other website data isn’t available to it.
Causes of the error include cache conflicts, problems with the network connection, or interference from browser extensions. By executing the 9 tested solutions listed above and described in this tutorial, the ERR_CACHE_MISS error can be solved and users can resume uninterrupted browsing.
Frequently Asked Questions
Q – What is the ERR_CACHE_MISS Error?
The caching problems in the browser are the root cause of the ERR_CACHE_MISS error. This indicates that often, the browser is unable to get the cache files from the website users are trying to access due to bugs or corruptions.
Q – What causes ERR_CACHE_MISS Error?
Majorly, the caching system, improper browser settings, and occasionally 3rd party add-ons are the causes of the ERR_CACHE_MISS. Resetting or updating the browser typically resolves the problem.
Q – How to Repair ERR_CACHE_MISS Error?
To repair the error, try any of the fixes like update the browser with the latest available version, reload or refresh the webpage, clear browsing data or history, refresh or change the network settings, deactivate chrome browser extensions, change LAN settings to automatic, change the browser settings, disable the cache system, and change DNS settings on windows PC.
